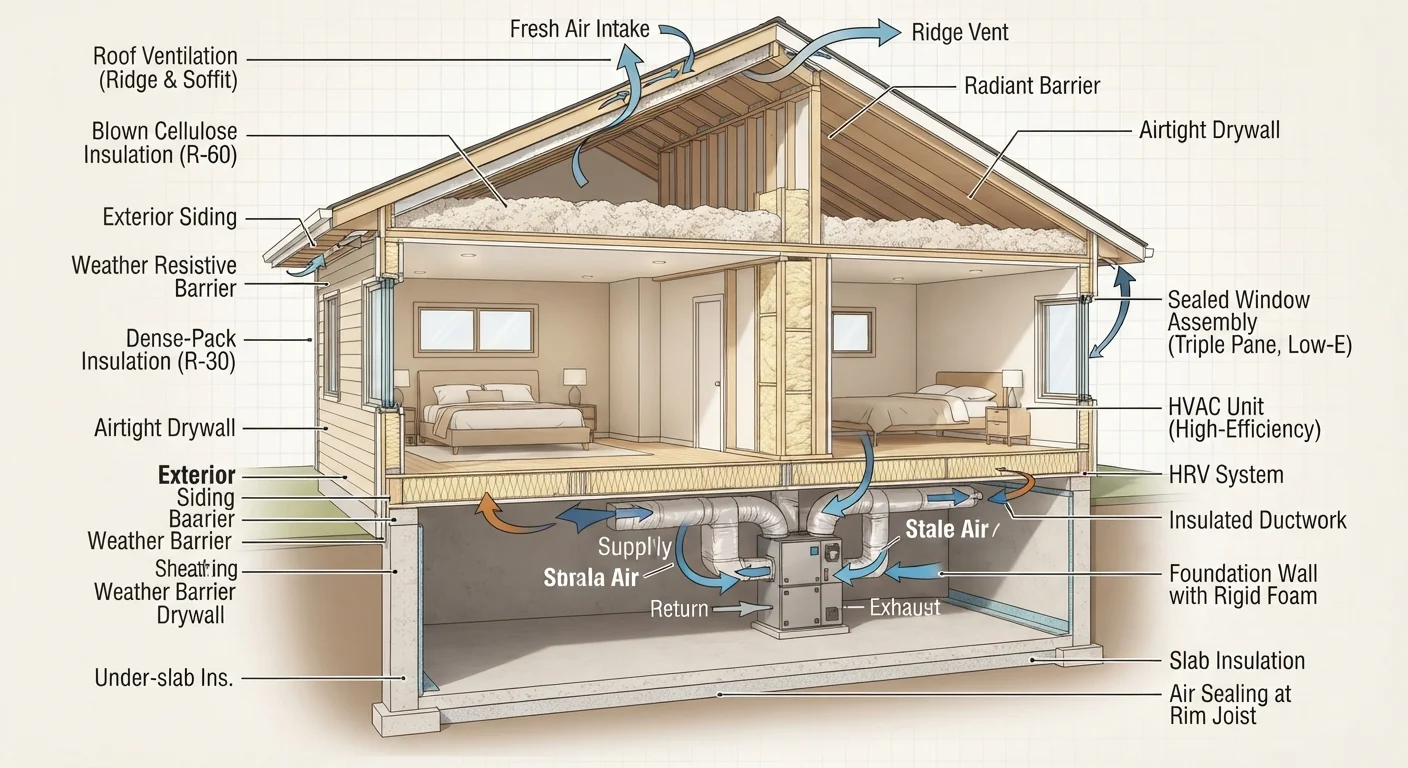
Why Your Home Is a System, Not a List of Parts
Most homeowners approach energy efficiency the way they shop for groceries — one item at a time. New windows one year, a furnace the next, attic insulation whenever it feels urgent. The problem with this piecemeal approach is that each upgrade's performance depends heavily on what surrounds it. A high-efficiency furnace installed in a leaky, under-insulated home will still cycle constantly to maintain temperature. New triple-pane windows in a drafty wall barely move the needle on your utility bill.
Building scientists use the term building envelope to describe the shell that separates your conditioned living space from the outdoors — walls, roof, foundation, windows, and doors. Treat the envelope as a single, integrated system and your upgrades compound each other's benefits. Ignore that relationship and you'll spend more than you need to for less improvement than you expected.
For a broader view of home upkeep, our home maintenance hub covers the full range of tasks that keep a house performing well over time.
Start with a Home Energy Audit
Before spending a dollar on upgrades, invest in a professional home energy audit. A certified energy auditor uses a blower door test — a calibrated fan mounted in an exterior doorway — to depressurize the house and measure total air leakage. Infrared cameras reveal exactly where heat escapes or enters. The result is a prioritized map of your home's inefficiencies, not a salesperson's guess.
Many utility companies offer audits at reduced cost or for free. Even a paid audit typically runs $200–$500 and can prevent you from spending thousands on the wrong upgrade first. Once you have your audit report in hand, the sequence below gives you a framework for acting on it.
Up to 30%
Heating and cooling savings from sealing and insulation
The U.S. Department of Energy estimates that homeowners can save up to 30% on heating and cooling costs by air sealing and adding insulation.
25–40%
Share of a home's energy lost through air leaks
According to the U.S. Environmental Protection Agency's ENERGY STAR program, air leaks account for 25–40% of the energy used for heating and cooling in a typical American home.
The Right Sequence: Seal, Insulate, Then Right-Size Equipment
The most effective order of operations follows a simple logic: reduce the load before you size the equipment meant to handle it.
Seal air leaks before adding any insulation
Insulation slows the rate of heat transfer through solid materials, but it does almost nothing to stop air moving freely through gaps. Plugging bypasses — where plumbing, wiring, and structural elements penetrate the thermal boundary — eliminates the convective losses that insulation alone cannot address.
Bring attic insulation to recommended levels before addressing walls
Heat rises, making the attic floor the highest-priority insulation location in most climates. The cost per square foot of adding blown-in insulation to an attic is typically lower than wall retrofits, and the performance gain per dollar is usually higher.
Right-size your HVAC replacement only after tightening the envelope
HVAC equipment is sized using load calculations that account for your home's heat loss and gain rates. If you reduce those rates through sealing and insulation first, the correctly sized replacement unit will be smaller, less expensive, and more efficient than one chosen for the old, leaky house.
Upgrade ventilation intentionally when you tighten a home significantly
A well-sealed home does not breathe the same way a leaky one does. Without planned mechanical ventilation, indoor air quality can deteriorate as moisture, cooking byproducts, and VOCs accumulate. Tightening and ventilating must be treated as a paired decision.
Address thermal bridging when remodeling exterior walls
Wood studs conduct heat far more readily than the insulation between them, creating 'thermal bridges' that undercut wall performance. Adding a layer of continuous rigid foam insulation over the sheathing breaks this bridge and meaningfully improves the effective R-value of the assembly.
For practical guidance on one of the most accessible first steps, see our weatherstripping walkthrough — a good entry point even before a full audit.
Where Windows Fit (and Where They Don't)
Windows are the most emotionally satisfying upgrade for many homeowners — they're visible, immediate, and often marketed as transformative. The reality is more nuanced. Even a high-performance window has far greater heat transfer than an insulated wall. Replacing single-pane windows with double- or triple-pane units does make a measurable difference, but only after air sealing and insulation are in place will you feel the full benefit.
If budget is limited, prioritize windows on the north and east faces of the home, where solar gain is minimal and heat loss tends to dominate. South-facing windows with proper overhangs can actually contribute passive solar heating in winter — replacing them with heavily tinted glass may work against you.
Time Window Upgrades With Other Projects
If you're already planning to reside your home or replace trim, that's an ideal moment to upgrade windows at the same time. The marginal labor cost drops significantly when the exterior is already open. Similarly, pairing window replacement with air sealing of the surrounding rough opening captures efficiency gains that a window swap alone would miss.
For a candid look at which improvements actually pay off at resale versus which disappoint, our article on home improvement return on investment puts windows and other upgrades in financial context.
Quick Wins You Can Act on Today
Not every effective energy improvement requires a contractor or a large budget. Several interventions deliver immediate, measurable results with minimal effort or expense — and many set the stage for larger upgrades to perform better down the road.
Our guide to insulation options for existing homes explains how blown-in and spray foam insulation can reach cavities that batts cannot — useful reading once you've addressed air sealing.
Avoiding the Myths That Cost You Money
One persistent misconception is that energy upgrades always pay for themselves quickly. The payback period varies widely depending on your climate, current energy rates, how much your home was leaking to begin with, and whether upgrades were sequenced properly. An honest audit report will include estimated payback periods — treat those as informed estimates, not guarantees.
Another common error: homeowners replace their HVAC system before tightening the envelope, then discover the new unit is now oversized for a well-sealed home. Oversized systems short-cycle — they heat or cool quickly, shut off, and restart repeatedly — which reduces efficiency, increases wear, and often leaves humidity uncontrolled. Always right-size equipment after envelope work is complete. Our article on renovation myths that lead homeowners astray covers several other assumptions worth questioning before you commit to a project.
Finally, tie energy improvement work into your regular inspection routine. Our seasonal home maintenance guide helps you build checks for insulation, weatherstripping, and HVAC filters into a reliable annual rhythm.
Permits and Codes Apply to Some Energy Work
In many jurisdictions, HVAC replacement, structural modifications, and certain insulation projects require permits or inspection by a licensed contractor. Requirements vary by municipality. Always verify what your local building department requires before starting any significant energy upgrade work — unpermitted work can create complications at resale.